Showing posts with label finish. Show all posts

Wednesday, June 4, 2025

A Finish and a New Challenge

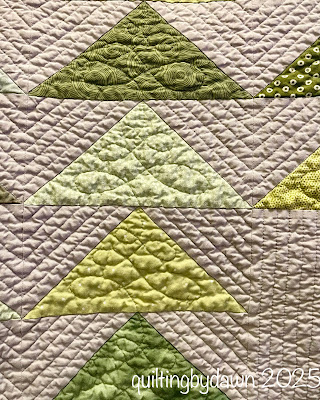
Today  I would like to share my newest finish with you. I have wanted to make a new quilt for my newest son-in-law for a while so I asked my daughter suggestions and colors. Brendan's favorite color is green and I choose a pattern with flying geese since he is a pilot. Looking through several patterns, we choose the pattern Formation, designed by Myra @Busy Hands Quilts. I had many greens in my stash, but I limited the spectrum to the lighter greens, ranging from yellow greens to sage.

I used Kona Ash for the background. This pattern was easy to machine piece. 
I straight line quilted 1/4" in the background/negative space with gray thread and FMQ in the geese with green thread. 
I used a solid green for the backing and one of the geese colors for the binding.


The quilt finishes at 63" x 72"

We were able to celebrate Brendan's birthday while we were visiting them in their beautiful new home in Salt Lake City, Utah.

Maker photo
Back in the summer of 2011, I found a challenge on Facebook to make a bowtie block a day! I completed that challenge but never found the challenge again. This year I decided to make a personal daily challenge throughout the summer months. I'm calling this challenge the (#100dayssummer2025project). I drafted a simple paper pieced dress pattern. I copied it and reversed the pattern so there will be 2 versions. 
To get 100 days, I started May 25th and will go to Sept 2nd.
Here are my first 7 blocks (I will try to post 1 week at a time).

All the dresses and tights are scraps from my stash. I am having fun 'dressing' the girls. The inspiration for this challenge came from the book, 
The 100 Dresses by Eleanor Estes.

I hope you enjoy watching as my collection of dresses grows!

Friday, February 2, 2024

A Reveal!

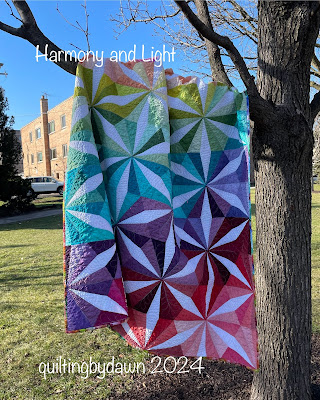
 This week I finished my Harmony and Light quilt! On Saturday night I put in the final stitches in the binding. On Sunday, I buried threads before throwing the quilt in the washer and dryer. I pulled it out so soft and wrinkly! 

Since the sun made a brief appearance (the first in almost 2 weeks), I decided that I needed to go on a photoshoot right away. You never know when the sun will come out again! 

The Harmony and Light pattern was designed by Christina Cameli @afewscraps. Back in 2022, I saw an notice that there was a free tutorial and pattern offer by Quilt Daily if you signed up. Christina's version of the quilt is beautiful made in her Sagura fabric line. I fell in love! I signed up and received the pattern download. While my husband and I were vacationing out west, we decided to stop in Hamilton, MO on the way home. I shopped for the fabric for this quilt at Missouri Star Quilt Co! I decided on Ombre by V & Co. in several different colors. 

I did use similar colors as Christina but I basically used solids rather than prints. 

It took a while to start cutting all the wedges but Christina's method was very helpful. Once finished with the cutting, I was again intimidated by all the colors and how to place them. The video tutorial again was very helpful as Christina described her method. Slowly, I started sewing the wedges into triangles with the white wedge between 2 colors. Once I had the required 140 - 60ยบ triangle pieces and 20 end wedge pieces in piles based on the progression of color, I needed to decide how to lay them out in the quilt. Once again, I turned to the tutorial to learn Christina's thought process on this stage of the quilt. I did want the diagonal movement across the quilt so it meant dividing up the colors into several rows while maintaining a flow of colors.  

   The cutting, piecing and placement took a good year to accomplish as I finally                                  finished the top in the beginning of January 2024!                      There was one last tutorial for the QAL and it was all about how to quilt the quilt. Again, Christina talked about her method of breaking down the shapes in the quilt - the white diamonds and the 'kite' shapes on either side of the white diamond. She suggested to start quilting at one of the kite shapes on either side of the white diamond (with feathers), then the other sides kite shape, followed by the whole length of white diamond (wavy line). Once you finish the diamond, you can turn your quilt and do the kites on the other side. You can actually go across the whole quilt in this method eliminating too many stops. 

I found the perfect wide backing that had all the colors that I used on the front of the quilt. I love it so much that I used it to bind the quilt also!

Harmony and Light finishes at 61" x 70"
If you are interested in my reveal video, you can find it on my Instagram or Facebook page. (I couldn't get it to load on blogger ๐Ÿ˜ฉ)
Linking to Off the Wall Friday, Finished or Not Friday, Can I Get a Whoop, Whoop?, Linky Party @Quilting, Patchwork and Applique, Wednesday Wait Loss, and Put Your Foot Down

Friday, November 18, 2022

Another Rainbow Scrap Finish

I have another RSC finish for 2022! All year long I worked on 3 different blocks for the challenge. This year's challenge is just about over and we are supposed to be working on finishing them up. On my last post, I showed my 1st finish,      Kaleidoscope. Today I'm posting about my Squiggles quilt finish!  

Squiggles was made from the bonus HSTs from the Kaleidoscope quilt plus a few additional  2 1/2" squares. It is my second of 3 RSC quilts made during 2022. This is a baby size quilt. All the fabrics were from my scraps and the backing is from my stash. I bought the white with black polka dots for the border because it coordinated with the backing and the black with white polka dots for the binding. 

Squiggles is a fun block to sew together but it was nice to have the HSTs already made. I am so glad I decided to use them in this quilt right away rather than in my orphaned blocks basket.
I quilted stitch in the ditch around each Squiggle , then a simple pattern each squiggle. In the background squiggles, I quilted the same pattern with variegated thread. I quilted a simple straight lines in the borders.
  
This little quilt finished size is approx. 30" x 38". 
I'm linking to Scrap Happy Saturday @ SoScrappy,  Off the Wall Fridays @ Creations-Quilts, Art, Whatever,  Finished or Not Fridays @ Alycia Quilts, Linky Party @Patchwork Quilts, Friday Foto Fun @ Powered By Quilting, Can I Get A Whoop, Whoop @ Confessions of a Fabric Addict

Sunday, November 6, 2022

Rainbow Scrap Finish!

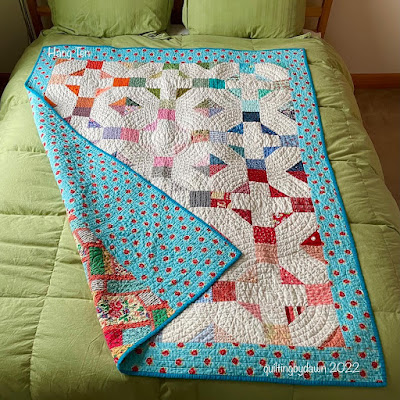
 Yesterday I put the last stitches in the binding of my RSC quilt, Hang Ten! This is the first of 3 RSC quilts that I have been working on in 2022. 

This quilt is made with the block Hang Time my Melissa Corry @Happy Quilting. Way back in January, I mistakenly called it Hang Ten. Since I have been calling it Hang Ten every month since, I'm sticking with it! EDIT: After looking at the pictures more, I've decided to change the name to Kaleidoscope. Doesn't the quilting and the rainbow colors just remind you of looking thru a kaleidoscope?
This quilt is all machine pieced and machine quilted. The Rainbow Scrap Challenge colors are announced each month by Angela @SoScrappy through October. November and December are to add to and/or finish up your quilt in time for the new year! I added a peach and gray block to round out the number of blocks to 12. 
All the fabrics are from my scrap bins or my stash except the rose print used in the border and to extend the backing. I love that I found this backing in my stash (inherited from my mom's sewing room) that is a perfect fit for the colorful top!

I machine quilted in a swirl about 3/4" apart in each block 
overlapping the quilting into the adjacent block. 
I love the texture that was created. I straight-line 
quilted every 3/4" in the borders. 
This quilt finished at 53" x 68"
I'm linking to Scrap Happy Saturday @SoScrappy,  Off the Wall Fridays @Creations-Quilts, Art, Whatever, Linky Party @Patchwork & Quilts and Friday Foto Fun @Powered by Quilting
Linking to Favorite Finish @Meadow Mist Designs

Friday, September 2, 2022

A Friday Finish!

 It is always fun to have a finish especially on Friday and when the quilt has been lingering around for some time!

I'm calling this quilt Small-Town Charm! The pattern, Mod Diamond Quilt is from Lindsey @Penandpaperpatterns. The fabric is Playground from @ArtGalleryFabrics and Kona white for the background.
I bought this pattern and fabrics quite a while back, started cutting, but it got pushed aside for various reasons. At the start of the summer, I was determined to finish this quilt. 

The backing is a upcycled sheet I had in my stash with a strip of scraps from the fabric collection. 
The construction of the quilt is made in columns, then sewn together alternating the direction of the white background triangles and the prints. It is all machine stitched. The quilt is quilted using 'stitch in the ditch' along the diagonal, horizontal, and vertical lines. 

The binding is Kona navy. 


The finished size is 63" x 70 1/2"

I am very happy with this finish! I'm linking to Finished or Not Friday @AlyciaQuilts, TGIFF @AnjaQuilts, Put Your Foot Down @TrueBlueQuilts, Off the Wall Friday @Creations, Quilts, Art...Whatever, Peacock Party @Wendy's Quilts, and Beauties Pageant @From Bolts to Beauty

On another note, here is my August calendar journal. This year is flying by!

Friday, July 15, 2022

Oh, My Strawberry Quilt!

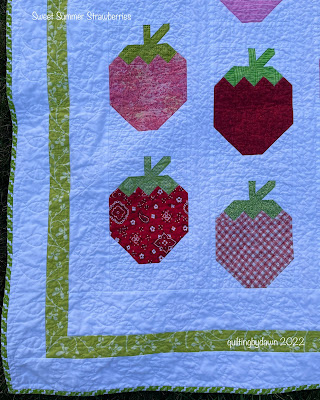
 I finished my Sweet Summer Strawberries Quilt! 

The strawberries are all made from pink or red scraps from my stash. The green fabrics for the leaves, the border and the binding are also from my stash. The red dotted fabric for the backing is also from stash. The only fabric that was purchased was the strawberry fabric for the pieced back and some additional Kona White. It makes me so happy when I can use my stash with positive results!

The pattern is Strawberry Social by The Pattern Basket. It is machine pieced and mostly FMQ in various patterns: small loops with red or pink threads inside the the strawberries. Larger loops were FMQ with white thread outside the strawberries and even larger loops in the outer border. Curls were FMQ in the first white border and straight-line quilted around the strawberries and elongated zigzags in the sashing between the strawberries. With green thread, I FMQ leaves in the strawberry leaves and straight-line quilted around the stems. I also FMQ a string of leaves in the green border.  
This quilt finished at 53" x 66 1/4"
The photo with one of my strawberry plants!

And a bowl of fresh strawberries! Yum!

I'm linking to Finished or Not Friday @Alycia Quilts, Linky Party @Patchwork and Quilting, Free Motion Mavericks @ Quilting and Learning, Brag about Your Beauty @From Bolt to Beauty, TGIFF @chrisknits, Friday Foto Fun @Powered By Quilting, Off the Wall Friday @Creations, Quilts, Art...Whatever.

Wednesday, March 30, 2022

A New Finish!

I have a new finish!

I finally finished my Macaron Mystery quilt designed by Cheryl @MeadowMist Designs. This is the 3rd mystery by Cheryl that I have followed. I really love her designs. The QAL started back in July 2021 and the parade ends April 7th. 

I am so pleased with how this quilt turned out. At first I wasn't fond of the half blocks on either end but with adding a border of the same background, it works just fine. It also extends the length. 
I pieced the backing with the leftover fabric pieces from the front and then framed it with Kona Turquoise. The binding is in Kona Oasis.
I straight line quilted around the montifs and gentle arches in the larger turquoise blocks. I FMQ feathers in the white borders. My quilt finishes at 61.5" x 71.5". I'm linking to the Macaron Mystery linky party.
Go check it out and see the many variations!