Wednesday, November 26, 2014

A few finishes

Today I will share a few finishes that I hadn't posted about yet. 
I talked about all the baby and wedding quilts that I needed to get done this past year or so but this baby quilt I just kept procrastinated on getting started.
 Possibly, because I had already made this pattern and my niece isn't due to the end of December. But when my niece saw my rainbow scrap challenge quilt she had expressed that she wanted it for her baby quilt. I wasn't giving her that quilt for her baby quilt...it wasn't baby sized...but she wanted the pattern. 
She asked nicely!
I so rarely make the same pattern more than once so I just couldn't get myself motivated to start. I spent some time pulling purple, gray and yellow fabrics from my stash and bought a few additional purples. Finally, I started cutting the fabrics...there is a bit of cutting and trimming with this pattern. 
And then I got the baby shower invitation! 
Yikes! 
Now I was under pressure to piece, sandwich, and quilt it! Not like I didn't have close to 9 months to get this done....
I FMQ the wreath of hearts in the middle and also in each bangle. 
I finished a few days before the shower and it was very well received.
I love that the leaves were still colorful so I got some pretty pictures of this quilt! The pattern is Russian Rubix by April Rosenthal for Prairie Grass Patterns.
I named this quilt Baby Bangles! 
The finished size is 33" x 43".

I also finished this quilt that I'm calling Fruit of the Spirit. I can't give too many details because I haven't delivered it yet to the intended recipient yet. 
This quilt was built around the large print fruit fabric...the squares are fussy cut with the apple, pear, peach and cherries then framed in Kona Cinnamon. I also found this coordinating striped fabric, Kensington by Quilting Treasures, that I cut and sewed together to form the striped squares. 
The border around the 9 center squares is Kona Sand. With the remaining pieces I created the outer border. I FMQ in the inner border The Fruit of the Spirit and each attribute.
The backing is an old piece of cheater fabric from my stash. I really like how it so nicely coordinated. I'm so pleased with the way this quilt turned out.
Now to get it labeled and delivered!

And last, I wanted to share this little mini that I made for Thanksgiving. 
I had tucked away in the back of my mind how to make a turkey using the dresden plate. Using this tutorial from Missouri Star Company
I made the turkey feathers. 
A quick search on the web brought me to MooseStash Quilting where Joan gave her turkey pattern. I had to resize the pieces as my turkey isn't as big as hers. 
I added Happy Thanksgiving with fusible appliqué and straight line quilted between each feather and following the points of the feathers.

Hope you all have a Blessed Thanksgiving with family and friends! 
We have much to be thankful for...stay cozy and warm! 

Saturday, November 1, 2014

Did you jump on the bandwagon?

I mean the EPP hexagon bandwagon? 
I searched back on my blog to try to find out when I jumped on started my hexagon quilt with no luck. 
The earliest picture I found dates back to May 5, 2011 and there were quite a few made then. However, I didn't have any plan in mind on how or what I would do with them. I had no clue what I was getting myself into how long this process would take.
The next post was on February 8, 2012 where I had made my hexagons into flowers. I remember that my original plan was not to do flowers but somewhere along the path I decided to make them into simple flowers. 

Then on March 17, 2013, it seems as if I had a plan to alternate scrappy colored flowers with white flowers with a colored center. 
 Notice that I only had one post per year in 2011 & 2012. I really didn't work on hexagons on a regular basis...just when I needed a portable project. 
 By July 31, 2013, I had quite a bit done but still much more to do. 
With the pattern I choose, I needed a LOT of filler pieces but by 
February 17, 2014, I was on my way to putting the pieces together! 
I could see a dim light at the end of the tunnel and I was determined to work harder on getting it done.
By April 18, 2014, I had the top pieced but it needed a border...so I started making more white hexagons.
Then I decided I wanted the top and bottom of the quilt to be straight rather than the zagged edge you get with hexagons. 
I needed to make half hexagons to fill in. 

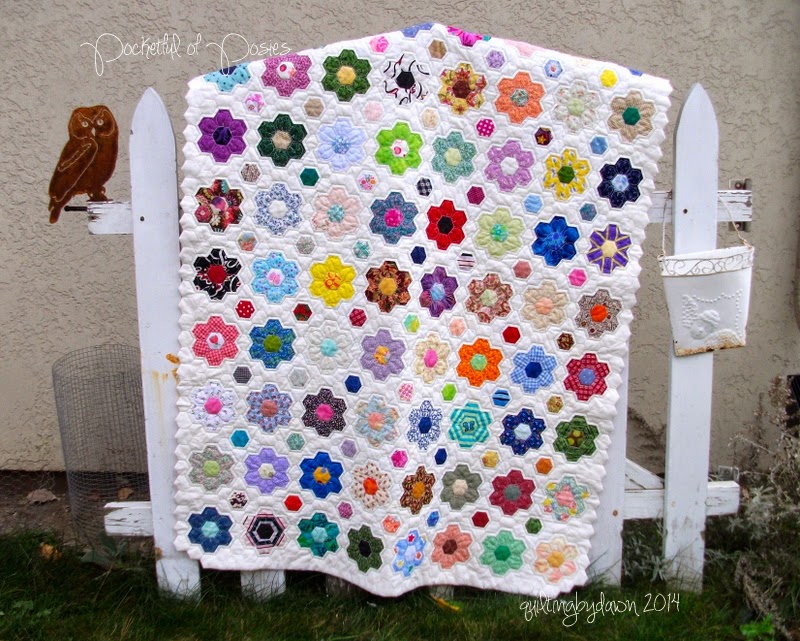
I am so happy to show you my finished quilt!
After many, many hours of hand piecing work, it is finished!!!
The binding was done using this method that I found on Pinterest. 
It does require you to make more hexagons to fit the outline of your top but it is worth it! I love how it turned out!
The back is a floral print from my stash. The binding hexagons are all from the same fabric from my stash.
I machine straight lined quilted around the scrappy flowers and around the centers of the white flowers. I FMQ petals in the scrappy flowers. 
(the only machine work on this quilt) 
Pocketful of Posies!
I am so stinking happy with this quilt! 
I am proud that I persevered and did not give up in the process...
and it was a long process! 

Wednesday, October 29, 2014

How can it be?

I know that I have been absent from my blog but how can it be that it has been almost 2 months? Time just flys by with a wink of the eye. 

I have been quite busy since my last post with several finished. My snowball quilt which I showed in progress is now all done. 
I finished the binding on our grueling trip back from Door County 
on Columbus Day. Traffic through Milwaukee took 2 hours! 
You can read more about the details here.
The backing is pieced from the left over pieces.
I quilted a clamshell motif over the snowballs and did some simple straight line quilting in the extra wide border separating each of the prints. 
It makes it feel like 6 borders!  
It finished at 64" x 78". 
I also finished knitting 8 newborn/premie hats for charity. I mentioned this project in previous post. The project is called Little Hats, Big Hearts and is with the organization Mended Little Hearts of Chicago partnered with the American Heart Association.
My knitting club has made 38 hats!

I also finished another mini quilt which was a result of blocks made and donated to a new quilt group in my community. We were to make 3 star blocks in red, white, and blue.


All this little cut-offs from making the points on the stars (flying geese) resulted in this little gem. 
It is 13 1/2" square...perfect for a candle mat or small table topper.  
I really love how the quilting looks... 

I have a couple more finishes and a few my quilts ready to be sandwiched...but I'll wait for another day! 

Hope you stay tuned and thanks for persevering through my 'drought'. 

Tuesday, September 2, 2014

What's Up?

A couple of posts back, I showed you the split snowball quilt that I am working on and the mini that I started with all those tiny cutoffs. Since then, I added a border on the sides and sandwiched and hand quilted it. 
It is hard to see the quilting besides in the border but it is also quilted in the brown triangles. 
It fits perfectly in my table top stand.
You can see the quilting a little better from the back.
The backing is a cute print used for the border on the large snowball quilt.
Adorable?
 I love the little dancing cups on the borders.
I'm calling this one Mornin' Sunshine mini.

My knitting group is also working on a charity project. It is called Little Hats, Big Hearts and is with the organization Mended Little Hearts of Chicago partnered with the American Heart Association. All babies born in February 2015 at participating hospitals will receive a knitted/crocheted red hat to raise awareness for congenital heart defects. 

Here are 2 that I have made so far! They are quick and easy to knit. 

So that's what I've been up to...what about you?

Sunday, August 24, 2014

Working hard to catch up!

And I finally made it!
For most of this year, I have been behind on my monthly Art Journals.  I kept track of my daily entries on my phone so I could recreate the days on the journals as I finished them. I only missed a few days...which most likely...didn't have anything too exciting happen. 

So drum roll please!

Here is July before I filled in the entries.
And with the entries filled in...
I do love this one with the flags waving across the blue sky!

And then August...
(these are supposed to be strawberries with a more rounded bottom)
I won't show the final until the end of the month is complete. 
Only a few more days!

And believe it or not...I have September ready early! Yippee!!
So there they are! 
A weight off my shoulders!
 Something to cross off my to do list!

Friday, August 22, 2014

Where Does the Time Go?

It has been a while since I have last posted. Life just doesn't seem to want to slow down. I have been spending some time in my sewing room which is always good! I have been putting off making the next baby quilt but will have to start on it sooner than later. I do have a bit of time yet.

So what have I been doing in my sewing room, you ask? Well, I have challenged myself into 1) sewing projects that I have purchased a bit ago and have been waiting on the back burner, and 2) using fabrics from my stash (much of which has been donated to me) and create. 

First, using a piece of fabric from my stash, I cut out as many 4" squares as I could (the pattern of flowers were in squares, so I cut them apart.)
After rearranging them on my design wall, I sewed them all back together. Then using this technique, I added the lattice on top. Thanks to Pat over at Life in the Scrapatch for the tutorial. 
The border is Kona Cotton Candy Blue, the binding and lattice is Kona Cotton White. The backing is a piece from my stash!
I also added a sleeve for hanging. 
The quilt finishes at 33.5" x 36"
I straight line quilted it along the lattice and in the border and FMQ a rose motif in the flowers.
A nice finish!

For the other part of my challenge, I dug out the fabrics that I purchased for a quilt that I saw in this magazine back in Feb/Mar 2011.
I fell in love with this retro feel fabric line called Early Bird by Cosmo Cricket. I went about purchasing some of the line and adding in other fabrics that I had that I felt coordinated nicely. 
I started on the split snowball blocks...80 blocks in total.
With every snowball block, you get 4 sets of 2 tiny triangles. I told myself that I wasn't going to save them this time. 
(I have several bunches of triangle cutoffs, ready to be sewn)
...But I couldn't help myself...
...they were just so cute...
SO...
I took some time off from the split snowball quilt to play with these...
Each HST is just 3/4" small. 
A mini flying geese...
Both the mini and the split snowball are ready to by sandwiched and quilted!

So that's what I've been up to, how about you?