Showing posts with label paper piece patterns. Show all posts

Sunday, July 11, 2021

Secret quilting reveal

 Today I am able to show you the quilt I have been working on! 

I finally gifted it to my SIL last night. His birthday was in June but we postponed the celebration for 1) they were in the process of buying a house and 2) I wasn't finished with the quilt. 

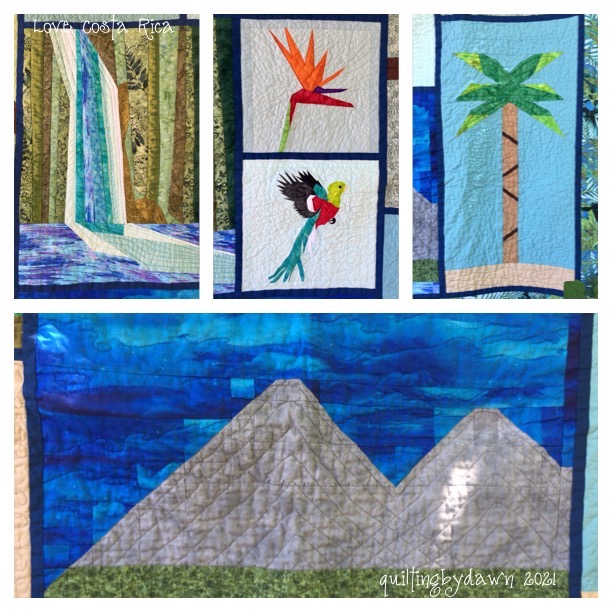
I made the quilt to honor his heritage. Jose was born in Costa Rica and all his family still live there. Jose came to the US to get his master's degree. I wanted to make a quilt that included things that reminded him of his home country. After much research, these are the blocks I decided on using. 

I put this together using several different resources. The narrow sashing is made with Kona Prussian as are the words Costa Rica and the binding. 
All the blocks are paper pieced. 
The backing is one piece of a coordinating color I found at JoAnn's. The borders are also from JoAnn's.
I raw edge appliqued the heart and Costa Rica in the heading border. I used a free heart clip art for the heart and a font (don't remember which font) on my computer that I enlarged. 
I straight lined quilted in the borders.
In most of the blocks' background, I FMQ a stipple and did a 
simple enhancement of the shapes of the figures. 
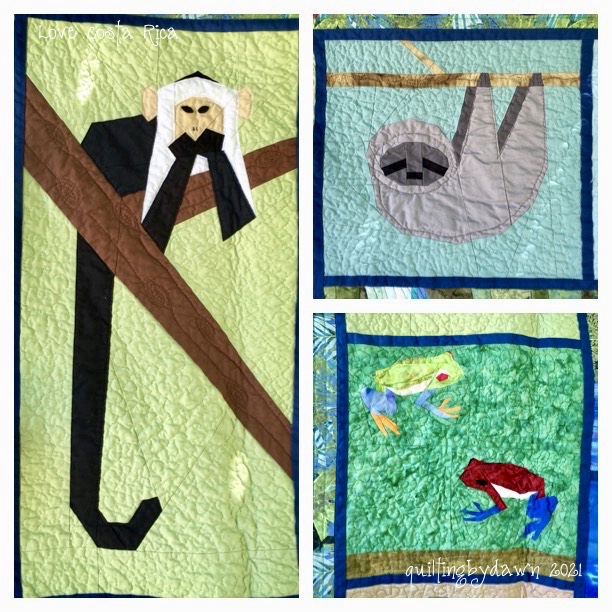
The capuchin monkey pattern was purchased from On William Street, the sloth was purchased through Etsy @CreoNodo, and the tree frogs were purchased from Silver Linings Originals.
The hummingbirds are a free pattern online at lillyella.com, the sea turtle was purchased from KohatuPatterns at Etsy, and the macaw is from On Williams Street. 
The waterfall, the palm tree and the volcano were draw and pieced by me, the bird of paradise is from Kohatu Patterns, and the quetzal is from eQuilt Patterns. 
❤️ Costa Rica finishes at 56" x 60.5"
This quilt was labor intensive...a labor of love. I have to say that I'm glad that it is with my SIL so that I can move onto other projects. 

I'm linking to Can I get a Whoop Whoop? @Confessions of a Fabric Addict, Link Party @Patchwork & Quilts, FridayFotoFun @PoweredbyQuilting, Off the Wall Friday @Creations -Quilts, Art, Whatever, Beauty Pageant @
from Bolt to Beauty, and Finished or Not Friday @Alycia Quilts

Monday, January 1, 2018

What happened while MIA?

For just about the last quarter of 2017, I went MIA from my blog. I keep saying that I'll get better at posting to my blog but I can't seem to find a time that life isn't busy! School has been busier this year from the start. 
I was doing a pretty decent job of keeping up with challenges and QAL's until November, then I was fell behind on all of them. 
However, I did get some quilting and other projects done during this time!
I did finish my 15 minutes of play quilt which is now named 
Thank Your Lucky Stars. 
In my last post, I had started quilting around the 20 different colored blocks and star points. I finished that quilting and started the negative space quilting. 
I quilted a swirl inside each star block and a braid between the blocks. 
The backing is a multi-colored print I found at Joann's. 
The binding is scrappy. The finished size is 54.5" x 68".
This quilt will be gifted to someone special.

I also made a gift for our nephew's baby boy. This traveled to Norway and was well received!
The blanket is fleece with a crocheted edge and the bib is made from a recycled men's shirt. The bowtie used scraps from a previous quilt. The pattern is found here. 

I spent a week in Austin with my daughters and SIL for Thanksgiving. My hubby and our oldest daughter flew down on Wednesday. It was fun to all be together. 

My DD2 has been learning indigo dyeing. Together we did a batch of tea towels and napkins. This is a fun but bit complicated process. I'm thinking of trying to do some fabric dyeing come summer and warmer temperatures.
Here are the folds we used.
My napkins.
My daughter's tea towels.
It was night by the time we finished the dyeing.

Christmas was around the corner and I needed to make my ornaments for the year. Based on a log cabin kit we bought while in Vancouver, I made these from mini wooden logs I found at a thrift store. 

I also made some hoop quilts for 2 special sister friends in my life. 
 The pattern for the gnome was found here. I made a slight adjustment to eliminate the ears. Hand embroidered, God Jul! (Merry Christmas in Norwegian)
I shrunk the pattern and added the tree from here. 

Another quilt that I made and gifted to a good friend was Flight.
This is a wall hanging quilt. Size 13" x 20.5"
The pattern is found on Craftsy.
I quilted around the plane and then I added some night sky constellations.  

And finally, yesterday I worked on my little spools for the Rainbow Scrap Challenge and the last stars for the Milky Way QAL.
Blacks and browns!
All the little spools, neat and orderly...arranged by color. 
Acrux star in peach.
Deneb star in gold.
9 Milky Way stars!
I added a scrappy star with fabrics from some of the previous stars. 
I like this a lot however I ran out of the gray background fabric. I need to go and look/shop for a gray that will match. I don't remember if this was a Kona or...? 
I still have a few blocks to finish for Grandma's Kitchen.
Linking up to ScrapHappySaturday over at So Scrappy.

Thanks for reading to the end! I know it was heavy on the pictures and words but that what happens when you go MIA for a couple of months. 
In the next few days, I will be contemplating what projects, QALs, and challenges I will be doing in 2018! 

What will you be joining! I'd love to hear! 

Hope everyone will have a warm and prosperous 2018!

Tuesday, July 17, 2012

Here they are!

Wow! What a world wind of inspiring blocks during the Red White and Blue Blog Hop! I want to thank all those that visited here. Your comments and encouragement meant a lot to me! 

Now, several of you asked for the patterns for the paper pieced stars which I drew. These included the Tennessee Star, Hawaii Star and the Star of Stripes. I finally had a chance to draw up the patterns to share. Thanks for your patience as I emerged back into life...jet lag...argh!
 Before I give the link, I wanted to give a few guide lines to my patterns. 
Each section that will be paper pieced together has a letter...A, B, C. Within those pieces, the sections are numbered 1, 2,3...etc. depending on the number of pieces to that section. When piecing, follow the number order.  
I also marked what color I used for each section. You can use that information and the pictures below  as a reference. Feel free to choose any color that you want. I also noted how to put together the sections to complete one quarter of the star. You need to make 4 for each star...make 4 copies of the pattern. 
Remember that when you paper piece, you are working from the back of the piece. If you are unfamiliar with this technique, I suggest that you look for some tutorials. I am not going to give a tutorial on paper piecing since there are many available online. 
One last bit of information...I am not very technical so I hope this works. I put a 1" square on each pattern so that you can tell if the pattern size is accurate. If you are having any problems, please leave me a comment or email and I will do my best to help. 
So without further adieu...


Yesterday I spent the day helping my DD1 with her apartment. After a full morning of running around for needed supplies, we were able to finish one of the projects. 


This is a no sew Faux Roman Shade that she found on Pinterest. It is cleverly constructed and looks great! It doesn't raise or lower easily but this window is in the studio part of her place so it doesn't need to be closed often.
While running around getting supplies, look what I found at Hancock Fabrics. 


Heather Ross' line of fabric ~ Crafty Chloe. There is one more print in the line but the store I was in hadn't received it yet. The prints are too cute...with the Heather Ross unique look. I love them!

I caught up with one of my BOM...First Monday of the Month over at Quilt Story. July's theme is rounded. Here is my block...


...and all of them so far...can you see my mistake? 
My HST block was made with Kona Snow and my Hour Glass block with Kona White. It will drive me crazy so I will be remaking the Hour Glass block.


I have hundreds of photos of our Norway vacation but I will only post a few in the coming days...don't want to bore you with vacation overload...but Norway is so beautiful...I'll share the best! 

Tomorrow is a big event day...I'll be back soon to show and tell!