Sunday, April 28, 2013

Art Journal and a UFO

While waiting for the fabric I ordered to arrive to back this quilt, I work on my May Art Journal Challenge pages. It seemed logical to me to use flowers for May since my April pages were of rain showers. We certainly had enough rain showers! Hope we have lots of May flowers!
I'm having so much fun with this project. And I love that I'm using fabrics and supplies from my scraps/stash. 
The buttons have been in my 'stuff' for a very long time! The bird is a sticker and I drew the tree branch with fabric markers. I'm pretty happy with it!

 With more time to pass, I got the urge to pull out some stitchery blocks I did SO long ago. In fact, looking back on my blog, I showed peeks of these here and here...way back in 2010! 
When I pulled out the blocks, I had drawings of the possible layout...but it was a little overwhelming to me on how to put together this puzzle. I even found my original drawings of the stitchery patterns I drew. 
I was determined to work on this UFO! 
I thought I would get some Kona Ash for the background and make the pinwheels from bright Kona colors to match the different flowers in the stitcheries.  
So I took a trip to my LQS and found Kona Ash...but I just had to looked through the sale fabrics...and there was Dimples by Andover in a bright pink. Thinking it might just work I grab it but just in case bought some Kona. 
 I auditioned both pieces.

I loved how the pink made the stitchery stand out and added a brightness. So, I started making the pinwheels using this new tool I found at a Quilting Expo I went to a couple of weeks ago. 
This is a unique ruler for squaring up HST! That shaded part running along the diagonal is actually a channel. 
It actually 'locks' in place along your seam. Trim 2 sides, then
rotate your piece and slide the ruler along the diagonal and trim the other sides. Makes a perfect HST!
I really liked using this tool!
After all the pinwheels were together, I started putting the pieces together. 
Here is the flimsy before the borders. 
The inner border is a narrow Kona Snow and the outer border a blue and white stripe from my stash! Sorry, no pictures. It is sandwiched and ready for quilting.  
Wait! Can you spot a mistake? 
I didn't until looking at these pictures. See the pinwheels in the upper right corner with the pink strip on top? They should have been reversed so the pinwheels were along the top and the pink strip framing the stitchery block. Should I rip it out or leave it as it is? Leave me a comment, I'd love to hear your opinion.

That's what I've been doing this week. What about you?

Sunday, April 21, 2013

Back to a Basic - Sunday's Summary

The very first quilt I made way back in 1996 was this log cabin quilt as a wedding gift for dear friends of ours.
Please don't be too critical...hair, glasses, blouse...yikes!
Then in 2002, I made Court House Steps, a variation of the traditional log cabin  block.
Both pictures taken before digital cameras. Colors so much better in real life!
So this week I felt like it was time to go back to the basic log cabin with a more modern twist! I have been working on these blocks.
I cut the solid Kona bone logs, 2 1/2" wide and the colored logs, 3 1/2" wide and then arranged them until I was happy with this...
This is now a flimsy on my design wall which accounts for the poor lighting. The 'star' is laid out a little off center. I love how visually it gives you the feeling that it just keeps going. I will leave it without a border. Now to find a backing...

This week has been pack with tragic events...Boston, Texas, and my own community with flooding. 

In light of all these events, I leave you with this verse... 

"My grace is sufficient for you, for my power is made perfect in weakness." 
2 Corinthians 12:9


Wednesday, April 17, 2013

Mid~week update = a finish!

Remember when I was playing with stripes and made these?
These squares were hanging around my design wall and I wanted to to something with them before moving on to another project. So I pulled out the remainder of the striped fabric and continued making squares. Since I didn't have enough fabric to make them all the size of these original squares, I made some smaller, trimmed some to fit, and them put them all together. This is what I came up with. I'm naming it Squared. 
I backed the quilt with a solid pink from my stash and FMQ with interlocking squares. 

Don't look too close as I was having a little trouble with thread breakage however I believe it was the thread not the design. This design was inspired by this interlocking circle tutorial.  The quilt is finished at about 30" x 36". 
I will donate this quilt to Project Linus.


Sunday, April 14, 2013

Sunday's Summary ~ Austin and more

 I found time to write a post midweek but I still haven't summarized my week in Austin...so... 
Over Spring break, DH and I flew to Houston and then drove to Austin to spend the week with our DD2, SIL, and DD3. On our way from Houston, we met up with our friends that live near Houston that we haven't seen in 20+ years. We kind of lost track after they moved to Louisiana from Chicagoland...after all we were busy raising kids...but thanks to facebook we 'found' each other again. They now live near Houston and we would drive right by where they lived so we made arrangements to meet up for a late lunch/coffee at a local Panera.
It was great catching up and it is amazing how it didn't feel like so many years had past. FRIENDS!
On to Austin where we had a wonderful time with our 'kids'. We did some hiking...
celebrated SIL and DH's birthdays...
with a delicious trifle made by DD2...
went mini golfing...
enjoyed a pretty sunset...
enjoyed some great ice tea...

and time together...


Miss them a lot!
And during our time in Houston, I delivered this quilt...
There is quite a story behind it...Jason, a dear friend of our kids, is a fly fisherman. About a year ago while I was visiting Austin, he talked to me about how he loved the coloring of Brook Trout and if I could make a quilt. I was excited about trying to make an artistic interpretation quilt. After buying some batiks, my DD2 told me that she didn't think Jason was serious. Disappointed, I but the fabrics away to forget about it.
A little over a month before we were again heading to Austin, DD2 tells me Jason is talking about a 'Brook Trout' quilt. Really?! 
So I found a picture of the brook trout and pixelated it.
The coloring has a distinctive sprinkling of red dots surrounded by blue haloes along the flanks and the bellies are bright coral especially during spawning. 
I decided to use 60° triangles in order to create the blue haloes instead of pixelated squares. I pulled out the batiks, started cutting and sewing, arranging triangles on my design wall until I felt it represented a brook trout. 
I quilted it with rayon threads using a technique by AmandaJean at CrazyQuiltMom called honeycomb quilting. I thought it gave the feel and shimmer of scales. 
My DD2 took professional pictures and I will post a few more details when I get them.
I pleased with the outcome but the bottom line...Jason loved it!

On our way back to Houston, we spent a day with my sister and brother in law...enjoyed their pool...and met my nephew's new girlfriend. 
A busy but fun week! 
 
Another finish but this post is long so I'll try to post midweek again.

Tuesday, April 9, 2013

An update!

I'm so excited to show you my latest finish! It has been in progress for a little over 1 year. Last year I joined the BOM with Quilt Story making a block each month according to the theme. Each block was to be 12 1/2" unfinished but I made mine 6 1/2" unfinished and then added Kona White around each block to make up the difference. I did this with the idea that I would practice my quilting of negative space. 

I signed up for the class on Craftsy ~ Machine Quilting Negative Space with Angela Walters to help with all the negative space I created in this quilt. I have to be honest as I am a bit impatient and have not finished the class. After viewing several classes, I jumped in. I echo quilted around each block and since they were offset, in the negative space created, I FMQ an organic boxy swirl. 
I'm pretty pleased with the results!

The backing is a Denyse Schmidt print. All the other prints are from my stash. The binding is scrappy leftovers from the blocks. 
The finished size of the quilt is 36"x 48" ~ a nice size throw.
I still need to label it and wash it so it has a nice crinkly look. 
I enjoyed doing this BOM...picking out my own blocks based on a theme: flying geese, HST, etc. It gave me the opportunity to try some new techniques.
Thanks Heather and Megan!

Sunday, April 7, 2013

Sunday's Summary

I'm a little late posting this as most of Sunday has past. It has been a little busy around here as my DD2 has come for a visit. It just happened that our plans for our visit to Austin and her plans to come home were just a week apart. Her main purpose in coming home is to see this little guy.


And his mommy...my DD2's best friend.

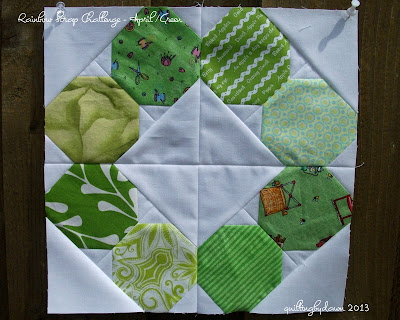
I did manage to get Rainbow Scrap Challenge block done. April's color is green!

Here are the finished blocks all together. Since my last post of this block, I have had several inquiries wanting to know about this pattern. It is called Russian Rubix by Prairie Grass patterns. I bought the pattern at Connecting Threads a while back. I didn't see it in their latest catalog and I'm not certain if it is available elsewhere.

I promised to tell you about the quilt I was working on to take to Austin but it is getting late so it will have to wait. I should also have my Quilt Story BOM quilt finished soon! 

Remember Hurricane Sandy? Well, I sent several blocks to help in the Hurricane Sandy Relief Quilt Effort...this week this postcard came in the mail.
Never expected it...just glad to do a small part...makes me smile to see the end results...helping people in need.